Launch of The Golden Paw Society – Freshly Found Was There!

Thanks to The Highway Mail for mentioning Freshly Found’s presence at the launch of the Golden Paw Society.  The theme of the event was recycling, which is where we fitted in.

I am so grateful to charities like the SPCA for the service they provide for recycling businesses like Freshly Found.

while I was there, I snapped some pics of the delightful venue.  Pop over to the Freshly Found Durban Blog to read about Marilyn’s Tea House at The SPCA


The Kloof and Highway SPCA launched their Golden Paw Society on 29 May at their premises in an attempt to get the community more involved and more aware about what goes on at the SPCA.
Barbara Patrick, manager of the Kloof and Highway SPCA said, “Our first priority is to get to know our community and get them to know more about us. We rely on the support of our community for finances and their time to help us.”
Marketing manager, Barbara Laubscher also emphasised the importance of getting the community involved. “We have a small staff and we need the community to become part of our family. We need the community to be our eyes and ears to report animal cruelty. There are also ways you can be involved however small from collecting coins, to donating clothing and items for the Village Green shops to spreading the good work of the SPCA to family and friends.”
The Golden Paw Society meetings will take place on the last Thursday of the month. The meetings are a way of providing feedback to the community about the SPCA’s latest projects, getting the community involved in the SPCA and letting the public get to know the faces behind the SPCA.
If you would like to become involved, contact Barbara Laubscher on 031 764 1212/3.

Crochet Cushion by an Enthusiastic Novice

 Crochet owes it’s widespread appeal to the fact that it is easy to do, and lends itself to so many delightful interpretations.
The simplicity and adaptability of the basic stitches tempt the novice to try her hand, and the expert to outdo herself
The Complete Book of Crochet by Elizabeth L Mathieson
 
I am passionate about crochet, but would not call myself an expert. After reading the quote above, I know that I fall into the Enthusiastic Novice category!
Here it is… The reveal of the creative endeavour that I waxed lyrical over in the last post.


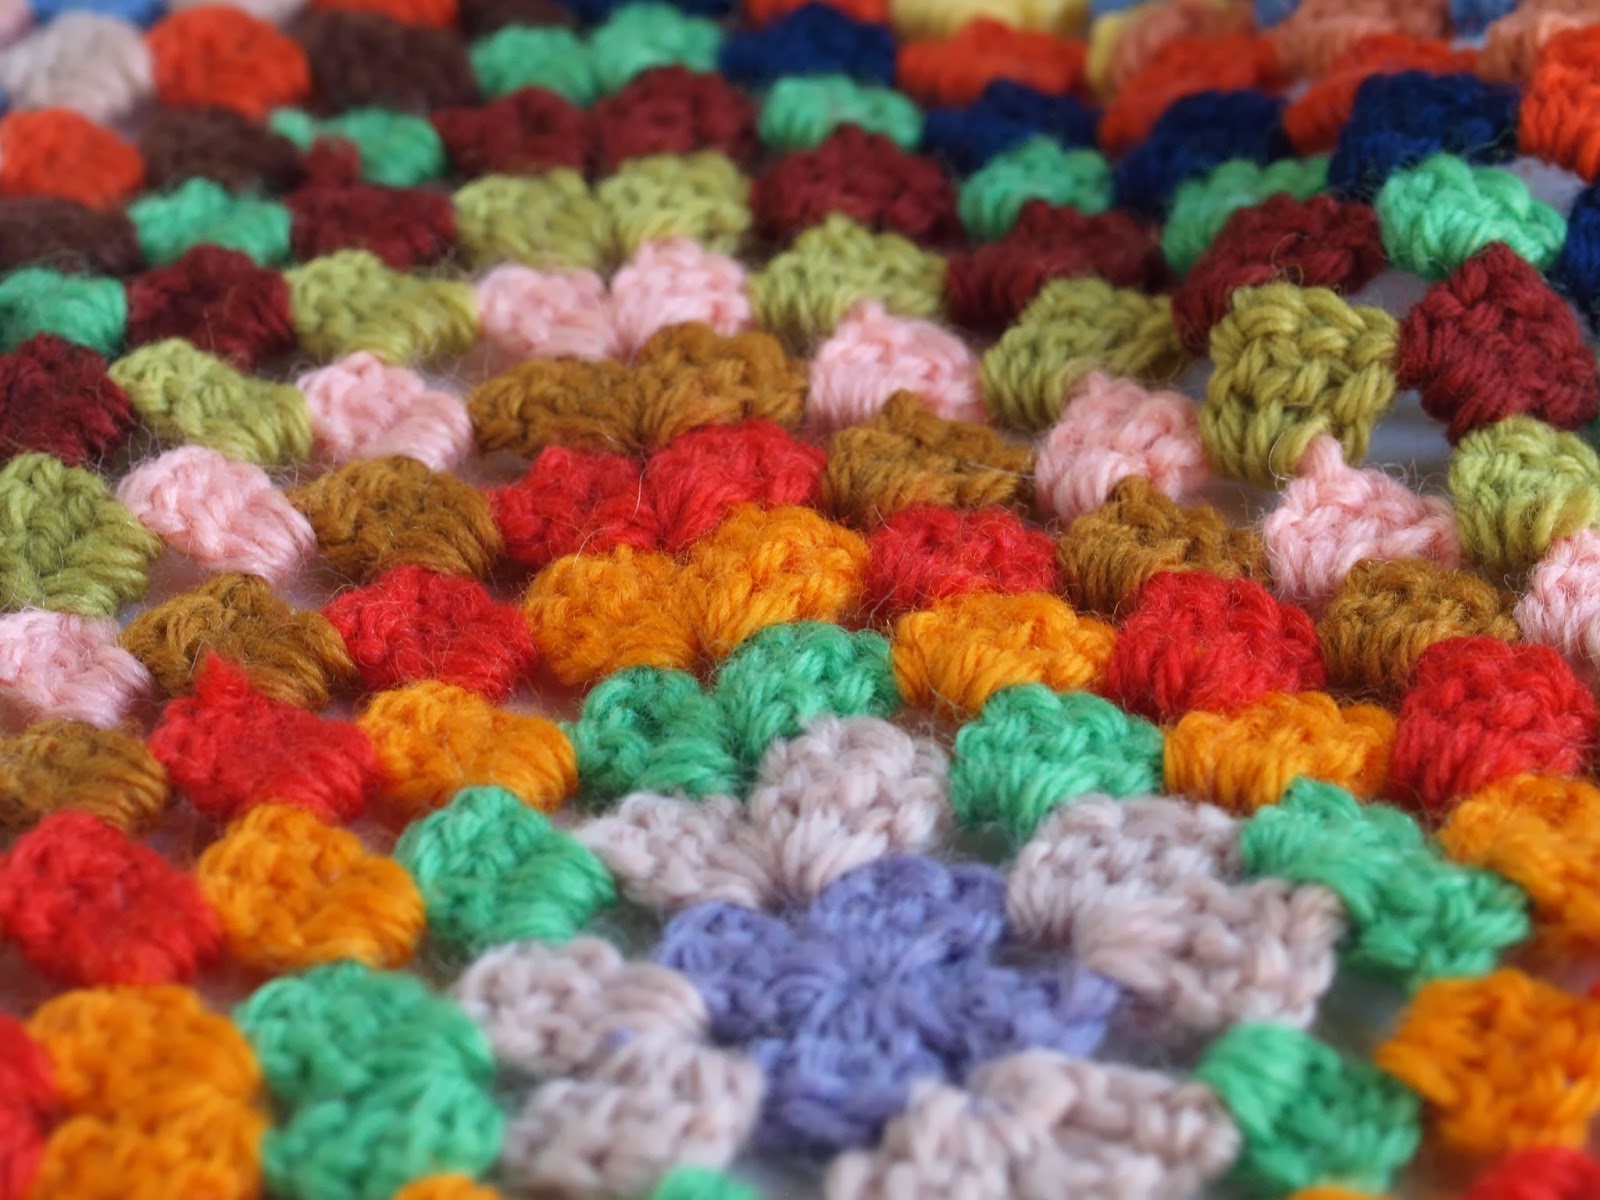
A cushion cover created from leftover tapestry wool – some from tapestries done by my mom or myself, as well as a beautiful charity shop bag-full!

As I started out I wasn’t absolutely sure of what the destination would look like, but I was excited to see what resulted from this cheerful random multicoloured yarn selection.

How I Did It:
I chose to make up small motifs – because of the relatively short lengths of wool.

I used size 3 1/2 crochet hook.  Tapestry wool thickness varied, but I found this size worked well with the average thickness.

Mini Motif:

First Round: Make a magic circle.  Chain 5.  Work (1tr and 2ch) into the circle 5 times.  Join with a ss to the 3rd of the first 5ch

Second Round: Ss into the first 2ch space.  Work 2 ch to count as first dc, 1 tr, 1ch, 1tr, 1dc into same space, (1dc, 1tr, 1ch, 1tr, 1dc into the next space) 5 times. Join with a ss into 2nd ch of first 2 ch

Pull thread through. Finish off centre thread.  Leave remaining thread for joining motifs together later..

Make 68 motifs in total.

Stitch the motifs together. 

Granny Square Backing:

First round:  Make a magic circle. 

Chain 3, 2tr, 2ch, (3tr, 2ch) 3 times, join with ss to 3rd of first 3ch.  Cut off yarn and finish off.

Second round: Start next colour in a 2ch space with a ss.  3ch to count as first tr, work 2 tr into same ch space, #1ch, work (3tr, 2ch3tr) into next 2 ch space to form corner.  rep from # twice more, 1 ch, 3tr into same 2ch space as beginning round, 2ch. join with a ss to first of 3ch.  Cut off yarn and finish off.

Third Round: Start next colour in a 2ch space with a ss.  3ch to count as first tr, work 2 tr into same ch space, #1ch, work 3tr into 1 ch space, 1ch, work (3tr, 2ch3tr) into next 2 ch space to form corner.  rep from # twice more, 1 ch, 3tr into 1 ch sp, 1ch, 3tr into same 2ch space as beginning round, 2ch. join with a ss to first of 3ch.  Cut off yarn and finish off.

4th – 17th Rounds:  Continue working the square in the same way.

Finish off ends where the colours are joined.  I had to join colours midway through some of the longer rounds when a colour ran out.

To Make Up: 

I made up a simple plain white linen undercover with a zip at the base.  
The cover is suitable for a 45cm square cushion.
Before hand-stitching, I pinned the the motif section front to the large granny square back, easing the slightly rectangular front to fit the square back. 
I left a gap in the base, and made chain stitch loops on the one side to fasten with buttons stitched on to the other side.

The cushion cover looks good both ways round!  

 There is a joy in wearing it, a subtle magic that goes into it, that the machine cannot copy or equal.  That is the secret of the charm of crochet – whether it is done for profit or as a hobby, a means of brightening a wardrobe or beautifying a home.  It’s an art that grows on you.
 The Complete Book of Crochet by Elizabeth L Mathieson

Natural Mood Enhancer

You are what you make …
I am passionate about crochet and these close-up pics of a recently finished project evoke an emotional response in me.
Why?
 
It’s because I have felt the fuzzy wool, and the cool steel hook.
I relished the gentle challenge of creating a pattern and the comforting rhythm of the repetitive stitches, as the work both occupied and distracted my brain.
I revel in the satisfaction of a job completed.
I feel the pleasure and surprise at the outcome of the partly planned and partly spontaneous project.
I enjoy the humour and the drama of a story of abandoned unused tapestry wools, who started out life qualified to be stitched onto canvas, then successfully navigated a career path change and found new purpose being linked together to form a unique fabric instead.
The random colours cheer me and the texture compels me to touch.
I am nostalgic and connected, with traditional crocheters from the past, with trendy crocheters of the present and with hopeful crocheters of the future.
I perceive affirmation because I made it and it looks good.
I  feel inspirational, because I am sure someone will see this and want to make one too!
 

As I was preparing this post yesterday, I was delighted to come across Cath Jenkin’s less-than-140-characters similar point of view:   


I want to run away, and go make jam and crochet for the rest of my life. Who wants to come with? @cathjenkin

Yes! Making and feeling is constructive therapy – and I’m in!  

[More about what the actual project is in an upcoming post!}

Quick Earring Revival Tut

I love the simple teardrop shape of these large earrings. 
They started out their costume life shiny gold… but soon became dull and coppery

So I decided to cover them in a bright tangerine cotton thread. 


And now they’re good to go  

To cover each earring –  ss, ch 1, dc all around the loop, packing the stitches in tightly to cover the metal underneath. Pull thread through and finish the ends off.
 

Pretty Pillow Covers from … Vintage Table Cloths

Here some vintage tablecloths make pretty pillow covers, with no cutting and minimal sewing.  

I have used these covers in my guest room as a decorative and useful way to store spare pillows.
If you would like to make one yourself, you will need:

  • 1 embroidered tablecloth approximately 82cm X 82cm [32in X 32in]
  • 1 zip approximately 55cm [22in] long
  • 1 pillow – the one I used was  45cm X 70cm [18in X28in].  


Fold the table cloth neatly in half, right sides together.with the fold at the bottom and the edges at the top.  Centre and mark the position of the pillow. [Measure the width of the tablecloth [82cm], and deduct the width of the pillow [70cm] .  Divide this amount [12cm]in half. This will give you the measurement for placement of the side seams in from the edge of the tablecloth.]  Mark this stitching line.  Centre the zip on the top edge.

Mark the beginning and end of the zip.  Place a pin at these points.

Stitch from the edge of the tablecloth to the pin.  Back stitch to secure. cut off the thread.

Repeat of the other side, stitching from the pin to the edge.  Pin the right side of the zipper to the right side side of the seam allowance for the zip.

Stitch all the way down the one side of the zip.  Then turn around an begin stitching the second side of the zip. 

On both sides of the zip, as you are stitching, you will have to stop just before you reach the zip head, lift the pressure foot, close or open the zip, to get the head out of the way, then continue stitching.

This is what the zip will look like once attached.

Turn the right sides out.  Position the zip in the centre, if you want the pattern on the front centred,

or position the zip at the base.  This is the way I may this cover.  Now stitch the side seams on the right side.  This will form an Oxford-type border.

Finish off neatly, and insert the pillow.  The pillow cover will be a little smaller than the pillow, which will result in a nice firm fit.

The exciting point about this is that the table cloth is not damaged, and can be unpicked and restored to it’s former life.  Enjoy!!! And let me know if you try it out!

Inner Sleeve Art

I have been inundated with orders for recycled record products since Freshly Found’s recent media coverage in the You magazine. I have been madly packing and posting parcels!
I like to recycle as much of the packaging as possible too, so have been tyeing each package with black video-tape ribbon.  Each one is accompanied by a card, handmade from found red paper and decorated with vintage record cover prints, found on the inner sleeve of the record packaging. 

This sleeve was too lovely to cut up and is on my noticeboard instead!

It’s been great to meet new customers country-wide 🙂

Shirt Cuff Bracelets

I have a lovely working association with Embocraft – a Training Trust close to my home in Botha’s Hill.  
Thuli is a delightful part of the team and maker of a number of Freshly Found products.  

Usually she follows my instructions well, but just recently I took her some shirt cuffs and a box of lace and buttons and asked her to see what she could come up with.  


I am delighted with the batch of quirky cuff bracelets that she produced.  They too will be at The Markets this weekend.See you at the i♥market on Saturday and Wondermarket on Sunday

Golden Hands Covered

This week I used some old posters to freshen up my much-loved vintage set of Golden Hands Books.  The reference books were faded, and – although I am a lover of orange in small doses, they looked overwhelmingly orange in my bookshelf.  
I used the wrong [white] side of the posters on the outside and made dustcovers for the set of 18.
 

I just love the 70s drawings that appear all the way through!
Golden Hands